


Air balancing ensures HVAC systems deliver proper airflow, improve comfort, and optimize energy use. For contractors, this process eliminates hot/cold spots, reduces energy waste, and extends equipment lifespan. Here’s how to do it right:
- Start with clear design plans: Document airflow needs, inspect ductwork for leaks, and ensure proper sealing at vents.
- Prepare the system: Confirm all equipment works, inspect dampers, and replace dirty filters to avoid skewed readings.
- Use accurate tools: Calibrate instruments like anemometers and balometers for precise airflow and pressure measurements.
- Follow a logical adjustment sequence: Balance dampers systematically, starting with the most underperforming outlets.
- Plan TAB work early: Coordinate with construction schedules to avoid delays and ensure system readiness.
- Focus on critical areas: Prioritize spaces like schools and hospitals, where air quality impacts health and safety.
- Create detailed reports: Document pre- and post-adjustment data to meet standards and simplify future maintenance.
- Hire certified professionals: Ensure TAB work meets industry standards like ASHRAE 111 for accuracy and compliance.
- Integrate with controls: Link TAB results with building automation for long-term efficiency and performance tracking.
- Follow codes and standards: Adhere to local regulations to avoid project setbacks and ensure system safety.
Proper air balancing saves energy, reduces costs, and improves system performance, ensuring comfort and reliability for years.
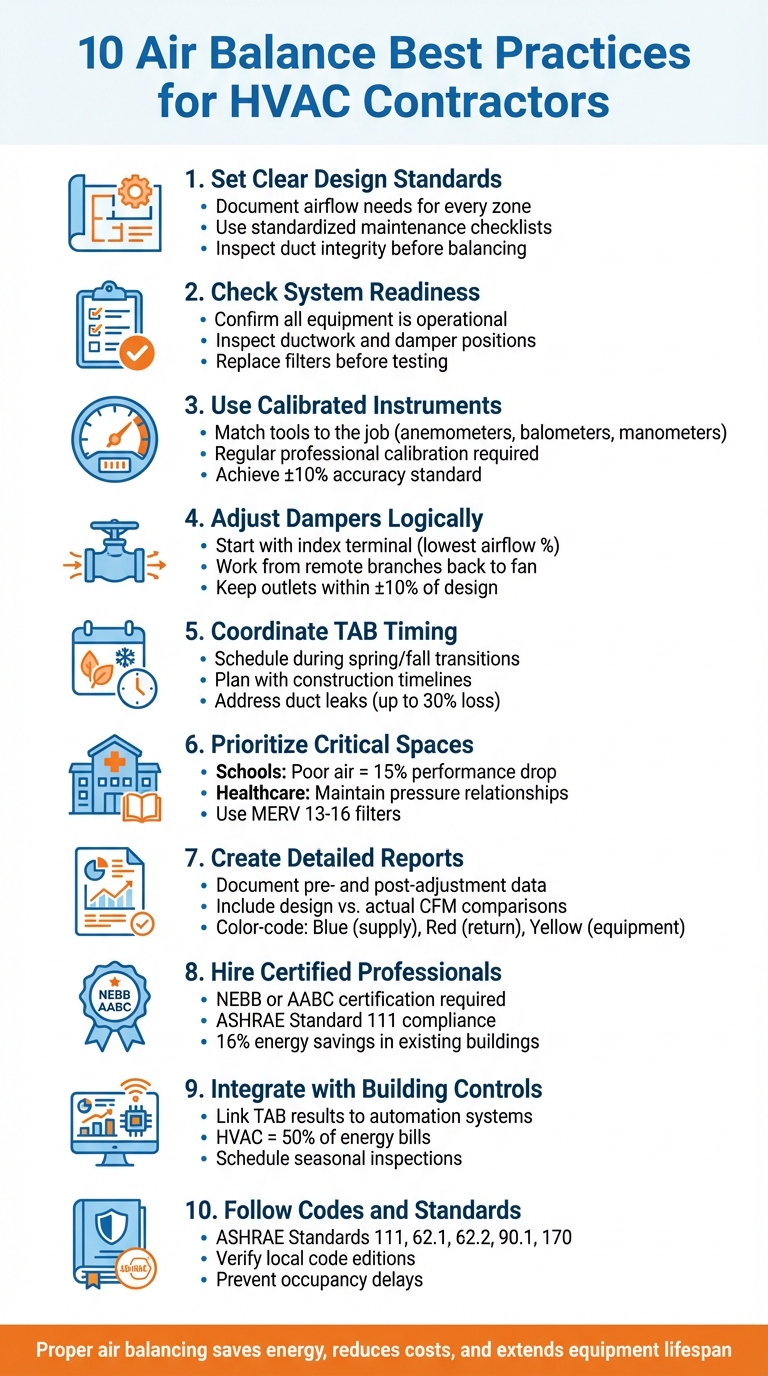
10 Air Balance Best Practices for HVAC Contractors Checklist
Flow Hood: How to Properly Balance an HVAC System
1. Set Clear Design and Documentation Standards
Before starting any air balance work, contractors must have detailed design documentation. Without clear guidelines, there’s no way to confirm if an HVAC system performs as intended. This means having precise plans that outline airflow needs for every zone, room, and terminal in the building. These plans serve as the foundation for using standardized checklists and conducting thorough duct inspections.
To build on this, create standardized maintenance checklists that clearly define the work scope. The ENERGY STAR maintenance checklist is a helpful tool for documenting equipment conditions and ensuring all necessary steps are covered. This approach establishes a shared understanding between contractors and clients from the outset.
Equally important is documenting duct integrity. A significant amount of airflow is often lost due to leaks and poor duct connections. Before balancing begins, inspect and record the condition of all ductwork, identifying any issues like leaks or weak connections. When specifying repairs, always recommend mastic sealant or metal tape over duct tape for a more durable and reliable seal.
Include system performance metrics in your documentation, such as SEER (Seasonal Energy Efficiency Ratio) ratings and current thermostat settings. These baseline measurements ensure the equipment aligns with both the project’s space requirements and budget.
Lastly, check that all connections at vents and registers are properly sealed where they meet floors, walls, and ceilings. Document the location and condition of filters as well, since clogged filters make systems work harder and can distort air balance measurements. Thorough documentation at this stage lays the groundwork for effective TAB adjustments and ensures compliance with regulations.
2. Check System Readiness Before Starting Balance Work
Jumping into air balance work without ensuring the system is ready can lead to delays and unreliable results. A thorough pre-inspection helps identify and address issues that might make balancing impossible.
Start by confirming all equipment is operational. Ensure every air handling unit (AHU), fan coil unit (FCU), and exhaust fan has completed pre-commissioning and is functioning as designed. Verify that the equipment meets the project’s specifications and is running properly. Rob ‘Doc’ Falke, President of the National Comfort Institute, highlights the importance of preparation: "Taking the time to prepare the known information contained in an air balance report while still in the office is preparation time well spent… this step reduces their balancing time in the field by 30% or more". Once equipment readiness is confirmed, move on to ductwork and damper inspections.
Inspect ductwork and damper positions before starting any measurements. Make sure the ductwork installation is complete, including insulation and cladding, and confirm the system has passed leakage tests. Check that all volume dampers, splitter dampers, VAV boxes, and fire dampers are fully open to allow maximum airflow during the initial phase. As Rob ‘Doc’ Falke advises, "walk or crawl the system and inspect for any defects that could make it un-balanceable". Keep in mind that air always takes the path of least resistance, so disconnected ducts or open access panels can significantly skew CFM readings. After addressing ductwork and damper positions, shift your focus to the filters.
Ensure filters are clean and correctly installed. Replace construction filters with fresh ones before starting the balancing process. Dirty filters can increase static pressure and throw off CFM readings. Inspect the filter rack to ensure the filter is seated tightly against the frame, leaving no gaps for air to bypass the media. Also, verify that the installed filter matches the MERV rating specified in the design documents. Using a filter with higher resistance than planned can distort both static pressure and airflow measurements.
Finally, check the building envelope to create a controlled testing environment. Confirm that doors, windows, and ceilings are installed and properly sealed. Make sure air terminals like grilles and registers are in their final positions and that return air inlets are free of obstructions like furniture or construction debris. Verify that any necessary test holes have been drilled in the ductwork for measurement probes. This preparation ensures the system is airtight and pressurized, setting the stage for accurate and efficient balancing.
3. Use Calibrated Instruments and Correct Measurement Methods
Getting accurate airflow measurements starts with using properly calibrated instruments. If your tools are off or unsuitable for the task, the data you collect could lead to system inefficiencies, regulatory headaches, or performance issues. As DwyerOmega puts it:
Precision matters when it comes to airflow measurement. Applications like cleanroom certification and HVAC balancing depend on accurate data to prevent inefficiencies, regulatory setbacks, and performance issues.
The key is to match your measurement tool to the job. For instance, a vane anemometer works well for measuring air velocity at residential outlets, like 4×10 floor registers. On the other hand, commercial diffusers, such as 24×24 cone diffusers, are better served by a flow hood (balometer), which gives you direct CFM readings without the hassle of velocity-to-volume conversions. When it comes to measuring pressure drops across filters or coils, a manometer is your go-to tool. Devices like the Fluke 922 Airflow Meter, which can measure down to 0.001 inH2O, are ideal for precise readings. For duct traverses, a hot wire anemometer or Pitot tube is best, as these tools allow you to take multiple velocity readings across the duct’s cross-section – this is the most accurate method for determining total system airflow.
If you’re using anemometers for grille measurements, don’t forget to factor in the AK value (effective area) provided by the manufacturer. This adjustment converts velocity readings into accurate CFM measurements. Ignoring this step could throw off your system balance. For rectangular ducts, aim for 25 to 49 readings to ensure accuracy, with about 64% of the data points taken within 7% of the distance from the duct wall. This placement helps capture the rapid air deceleration near the edges.
Calibration is non-negotiable. High-quality instruments are worth the investment because unreliable tools lead to unreliable results. Regular professional calibration ensures your equipment stays precise, which is critical when standards require airflow at each outlet to be within 10% of the design value. Rob ‘Doc’ Falke, President of the National Comfort Institute, highlights the importance of a comprehensive approach:
Measurement with an air-balancing hood alone is insufficient to balance a system. Additional testing is essential… including total external static pressure, fan speed, temperature change through the equipment, and electrical measurements.
Before starting any measurements, zero your manometer at ambient pressure with the tubing attached. Once your instruments are properly zeroed and calibrated, you’re ready to collect data. These steps are crucial for achieving the precise airflow needed for energy efficiency and optimal system performance.
4. Adjust Dampers and Terminals in a Logical Sequence
Once you’ve gathered accurate measurements, it’s time to adjust the system. The goal here is to fine-tune dampers and terminals to match the design airflow, following a logical sequence to ensure air is redistributed effectively without over-restricting the system. Start by measuring and recording the initial airflow at every supply and return outlet before making any changes. These baseline readings will guide your adjustments.
Begin by identifying the index terminal – this is the outlet with the lowest percentage of its design airflow (often the one farthest from the fan). Adjust dampers proportionally so all terminals on the same branch deliver an equal percentage of their design airflow. Use the design airflow values from Section 1 as your reference. Once the branch is balanced proportionally, fine-tune the main branch damper to bring all terminals up to their target airflow simultaneously. Jason Rende, an HVAC Designer and Air Balancing Specialist, advises:
Start by adjusting the outlets that are furthest over their design airflow first. This helps redistribute air to under-performing outlets without over-restricting the system.
Work systematically, starting with the most remote branch and sub-branch, and move back toward the fan. For outlets exceeding 110% of their design airflow, partially close the dampers to redirect air to outlets with lower flow. As noted by Method Statement HQ:
As the dampers are closed along the run, more air will be driven towards the downstream terminals and the volume of air discharged at the terminal index will rise.
The industry standard for airflow balance is to keep all outlets within ±10% of their design airflow.
Because adjusting one damper impacts the entire system, remeasure airflow at each outlet multiple times to ensure accuracy. To speed up the process, use a two-person team – one person to adjust dampers and another to take measurements. Numbering supply registers and return grilles on a simple floor plan can also help keep your reporting organized.
Once all outlets are within the ±10% tolerance range, lock the manual dampers in place and record the final CFM readings. This step ensures the system remains efficient and balanced over time. By following this structured approach, you’ll achieve consistent airflow and maintain optimal static pressure throughout the system.
5. Coordinate TAB Work with Construction Timelines
Plan TAB (Testing, Adjusting, and Balancing) work during transitional seasons like spring and fall to minimize project delays and ensure availability of qualified professionals. This timing is crucial for avoiding setbacks that could impact obtaining your certificate of occupancy.
Before starting, confirm that the mechanical contractor has completed all inspections, repairs, and cleaning tasks. As Peter Diperna, Mechanical Technical Specialist at Fitzmeyer & Tocci Associates Inc., explains:
Effective communication with the design team, building owners and installing mechanical contractors is necessary to understand the design intent and to report issues before completing the balancing.
Create a detailed TAB plan that outlines the roles and responsibilities of every contractor involved. This step ensures everyone is aligned, paving the way for accurate control adjustments later in the process.
It’s also essential to have the DDC (Direct Digital Control) technician on-site during adjustments to calibrate sensors and dampers. For retrofit projects, produce a pre-design balance report to document the condition of existing equipment.
Address system readiness issues as early as possible, as up to 30% of duct airflow can be lost due to leaks or poor connections. Verify duct integrity before final balancing begins, and replace filters to ensure accurate pressure readings during testing. Since neglect and inadequate maintenance often lead to system inefficiencies, resolving these problems beforehand is critical. Clear communication about these checks will help identify and fix discrepancies promptly.
If you encounter deviations from design specifications – like undersized ducts or equipment that’s difficult to access – notify the engineer of record immediately. Escalating these issues early allows for technical solutions that prevent costly rework and help keep the project on track. Proactive communication at this stage is key to avoiding delays and ensuring a smooth process.
6. Focus on High-Priority Spaces Like Healthcare and Schools
Healthcare facilities and schools require stricter air balance standards compared to typical commercial buildings because poor indoor air quality can directly impact the performance and well-being of occupants. For instance, studies show that inadequate air balance in schools can lower student performance by up to 15%. Hospitals, on the other hand, rely on carefully maintained pressure relationships to ensure proper ventilation and safety.
Each high-priority space has its own unique ventilation needs. For example, laboratories and commercial kitchens demand higher ventilation rates than standard classrooms or patient rooms due to the presence of chemicals, smoke, or other pollutants. Similarly, renovations or changes in occupancy within schools can disrupt air balance, potentially increasing energy consumption by as much as 10%.
In healthcare settings, maintaining proper pressure relationships is essential. High-capacity exhaust systems can create significant negative pressure if not balanced with sufficient intake air. To counter this, ensure there are clear pathways for makeup air. For example, doors may need a minimum clearance of 3/4 inch from the finished floor to allow proper airflow. Additionally, confirm that ventilation rates comply with local building codes.
Filtering efficiency is another critical factor in these spaces. Filter selection plays a key role in protecting occupants from airborne contaminants. Historically, schools often used MERV 8 filters, but MERV 13 filters are now recommended as they remove 77% of infectious aerosols like SARS-CoV-2 or influenza. In healthcare settings, MERV 16 filters offer even greater protection, capturing 95% of such aerosols. When it comes to wildfire smoke, MERV 13 filters capture about 69% of particles, while MERV 16 filters achieve 96% removal. It’s important to monitor filter specifications, such as MERV ratings and pressure drop tolerances, at the district level.
To further enhance indoor air quality, maintain indoor humidity levels between 30% and 50% to prevent mold growth and respiratory issues. Inspect HVAC filters at least quarterly in schools, and verify airflow using calibrated ventilation meters or capture hoods.
7. Create Clear and Detailed TAB Reports
A well-prepared TAB (Testing, Adjusting, and Balancing) report is more than just a formality – it’s a vital record of inspections and approvals. By documenting both pre- and post-adjustment conditions, this report ensures accountability and serves as a reference for future maintenance. Be sure to include key details like the test date, project name, location, system type, and the balancer’s name.
At the heart of the report lies a comparison between design specifications and actual measurements. For each outlet, list the design CFM alongside the measured airflow, and include corresponding room names, outlet numbers, and calculated totals to verify the system’s performance. Label all equipment using standardized codes (e.g., F-1 for furnaces, AH-1 for air handlers, EF for exhaust fans) and keep the manufacturer data in the job file for easy access.
You can save significant time in the field – up to 30% or more – by preparing your report in the office before heading on-site. Rob ‘Doc’ Falke emphasizes the value of a well-organized report:
"A clear and readable air balance report can be on-site verified with the balancer walking the job with the owner or commissioning agent in a fraction of the time it takes to balance a project."
To make the report even more effective, use color-coding: blue for supply, red for return, and yellow for equipment. Number the outlets in the order they should be balanced, starting with the one farthest from the equipment. These steps not only streamline the balancing process but also make the report a practical tool for immediate validation and long-term maintenance.
Additionally, a structured TAB report serves as a baseline for future troubleshooting. By documenting the differences between design and measured CFM, maintenance teams gain a reliable reference point to identify changes and simplify final inspections.
8. Work with Certified Air Balance Professionals
When it comes to Testing, Adjusting, and Balancing (TAB) work, certification is a key indicator of a technician or firm’s expertise. Organizations like the National Environmental Balancing Bureau (NEBB) and the Associated Air Balance Council (AABC) uphold strict standards, including compliance with ASHRAE Standard 111. They also require that testing instruments are calibrated within the last six months to maintain accuracy in measurements. Certification isn’t just a badge – it’s a guarantee of adherence to high industry standards.
Earning such certification is no small feat. For instance, NEBB’s individual certification demands mastery of six core areas and passing a rigorous 5-hour exam. On the firm side, certification requires at least a year of continuous operation with a dedicated TAB team and endorsements from industry professionals. These requirements ensure that only seasoned experts with proven skills handle TAB projects.
The benefits of hiring certified professionals are well-documented. Research from the Lawrence Berkeley National Laboratory highlights that proper commissioning, which includes TAB, can deliver median energy savings of 16% in existing buildings and 13% in new construction. Certified professionals ensure HVAC systems meet both design specifications and regulatory standards. NEBB emphasizes this point:
"The purpose of NEBB’s TAB certification program is to offer tangible proof of competent firms and professionals qualified in the proper methods and procedures for testing building systems for optimum performance".
This level of reliability is crucial for ensuring your project’s TAB performance is optimized from start to finish.
Before hiring a TAB contractor, verify their current certification and request calibration records for their equipment. The final TAB report should be signed and stamped by a certified professional, providing the formal validation often required for project closeouts and inspections. Beyond performance validation, certification also assures familiarity with local codes and industry standards, helping you avoid setbacks and ensuring a smoother project completion.
9. Connect TAB Results with Building Controls and Maintenance
For an HVAC system to remain balanced and efficient, it’s crucial to integrate Testing, Adjusting, and Balancing (TAB) results with building automation systems and a consistent maintenance schedule. The TAB report acts as a blueprint for how the system should function under ideal conditions. When paired with smart building controls that track energy usage, this data becomes a powerful tool for proactive monitoring and timely adjustments.
Modern building automation makes this process easier than ever. For example, ENERGY STAR smart thermostats can generate monthly energy reports, providing a clear baseline for comparison. These systems also allow for real-time, remote adjustments, giving property managers and homeowners greater control over energy consumption.
Why is this integration so important? Heating and cooling typically account for almost 50% of the average $1,900 annual home energy bill. Automation systems can only regulate the air that’s actually being delivered, so ensuring ductwork is in good condition is a critical first step before programming controls. Without addressing duct integrity, even the best automation system won’t perform as intended.
Maintenance plays a direct role in sustaining the balance established by TAB. Professional inspections should be scheduled seasonally – cooling systems in the spring and heating systems in the fall. During these visits, technicians can also educate clients on simple but essential tasks like monthly filter cleaning or replacement. Neglecting this step can disrupt airflow and throw the system out of balance. As Denise Minor-Hoes from ENERGY STAR points out:
Dirt and neglect are the top causes of heating and cooling system failure and inefficiency. Maintaining your equipment will keep your system operating at peak performance and prevent future problems and unwanted costs.
When expanding on TAB findings, it’s important to document key measurements, such as total external static pressure, fan speed (RPM), temperature changes through the equipment, and electrical readings. These measurements provide a reliable baseline for tracking performance over time. Additionally, dampers should be marked and locked in their final positions, making it easier for future technicians to verify whether settings have shifted. This documentation not only helps identify mechanical failures but also distinguishes them from gradual system drift in automated controls.
10. Follow Industry Standards and Local Building Codes
Air balancing plays a critical role in meeting legal requirements and ensuring systems perform as intended. It also helps avoid potential headaches like occupancy delays or expensive rework. Understanding the relevant standards and how local authorities enforce them can make the difference between a smooth approval process and unexpected project setbacks. This is where thorough TAB (Testing, Adjusting, and Balancing) reports become indispensable, as highlighted earlier.
In the U.S., TAB work is guided by ASHRAE Standard 111-2008 (RA 2017), along with other key standards like 62.1 and 62.2 for ventilation, 90.1 for energy efficiency, and 170 for healthcare. These standards ensure systems meet performance benchmarks and comply with regulations. Everything from measurement techniques to damper adjustments aligns with these guidelines, forming the backbone of TAB practices discussed in this guide.
Building codes are not optional – they’re mandatory and enforced through plan reviews and on-site inspections. Without proper TAB documentation that demonstrates compliance with these standards, final inspections can fail to gain approval. This makes detailed and accurate reporting a non-negotiable part of the process.
Local jurisdictions vary in which code editions they adopt, so it’s essential to confirm the specific version applicable to your project. TAB reports should explicitly reference the relevant ASHRAE standards, such as Standard 111. Additionally, integrating TAB work into the commissioning schedule helps prevent delays and keeps projects on track. Clear documentation that cites applicable standards not only simplifies the work for engineers but also streamlines the inspection process for code officials.
A study by FEMA highlights the financial benefits of adhering to modern building codes, showing that such practices save billions in potential losses. Compliance doesn’t just protect timelines – it ensures the safety and performance of the building itself.
Make air balancing part of every job
Air balancing is far more than a routine task – it’s the backbone of a high-performing HVAC system. The 10 best practices shared in this guide work together to ensure every vent delivers the right amount of conditioned air, equipment operates as designed, and clients experience the comfort and efficiency they deserve. By establishing clear documentation standards, ensuring systems are ready, using precise instruments, and following a logical adjustment process, you’re setting the foundation for a system that will perform dependably for years.
The financial advantages are undeniable. With heating and cooling accounting for nearly half of a home’s energy costs, proper air balancing can significantly reduce expenses for your clients. In commercial applications, well-balanced systems consume less energy, experience fewer breakdowns, and have a longer lifespan. This ensures HVAC systems operate at their best, delivering the efficiency and reliability clients count on.
Beyond the technical and financial perks, these practices also safeguard your professional reputation. A properly balanced system eliminates common complaints like uneven temperatures in large buildings, ensures adequate ventilation in critical spaces such as hospitals and schools, and helps meet the regulatory requirements set by engineers and building officials. Coordinating testing, adjusting, and balancing (TAB) work with construction schedules and integrating results with building controls showcases the expertise that sets you apart as a leader in the industry.
Precise adjustments – like fine-tuning dampers to within 10% of the design airflow, recording system pressures, and creating thorough TAB reports – not only reduce wear and tear on equipment but also extend system longevity and build trust with clients. By minimizing duct losses, every cubic foot of conditioned air reaches its intended destination.
FAQs
How does proper air balancing enhance HVAC system efficiency?
Proper air balancing is all about making sure every part of an HVAC system gets the right amount of airflow. When this happens, the system can function the way it was intended. This means better heat transfer across coils, less wear and tear on components, and improved overall performance.
Balanced airflow also boosts efficiency, which can cut down on energy waste and help lower utility bills. Plus, it reduces strain on vital parts of the system, helping the equipment last longer.
Why should I hire certified professionals for HVAC testing and balancing?
Hiring certified Testing, Adjusting, and Balancing (TAB) professionals is a smart move if you want your HVAC system to run smoothly, save energy, and meet all necessary regulations. A certified technician is trained to fine-tune key aspects like airflow, pressure, temperature, and water flow, ensuring your system matches design specs and complies with building codes. The result? Consistent indoor comfort, improved air quality, and reduced utility bills.
These professionals are backed by respected organizations such as NEBB, TABB, and AABC. Certification from these groups involves passing tough exams, ongoing training, and following a strict code of conduct. Plus, hiring a certified expert ensures compliance with standards like ASHRAE 90.1 and ASHRAE 62.1, safeguarding your investment and keeping your system performing well for years to come.
How do building automation systems help maintain proper air balance in HVAC systems?
Building automation systems (BAS) are essential for keeping indoor air balance in check. These systems constantly monitor factors like CO₂ levels, humidity, and outdoor temperature, then adjust components such as dampers, fans, and air intake in real time to match the building’s design requirements.
With automation handling these tasks, BAS ensures airflow stays within the ±10% tolerance that air-balancing experts aim for, minimizing the need for manual adjustments. It also helps meet energy-efficiency standards. This level of control is especially critical in places like schools and healthcare facilities, where maintaining precise air quality is key to ensuring both safety and comfort.


