


Duct leakage testing is a process that measures how airtight HVAC ductwork is, ensuring systems meet energy codes and design standards. This testing is crucial for reducing energy waste, improving indoor air quality, and maintaining HVAC efficiency in commercial buildings. Here’s what you need to know:
- Why it matters: Even a 10% leakage rate can increase fan energy use by 27% and reduce cooling capacity by up to 25%. For a medium-sized city, a 5% leakage rate can waste 380 GWh of energy annually.
- Who needs it: HVAC contractors, engineers, and building managers use this test to comply with standards like IECC and SMACNA. It’s often required for large facilities, clean rooms, and municipal projects.
- How it works: A calibrated fan pressurizes the ducts, and airflow is measured to detect leaks. Testing can occur during "rough-in" (before drywall) or "final" (after installation).
- Challenges: Issues like tape failure, equipment leaks, and post-test damage can affect results. Tools like smoke emitters and remote monitoring apps help address these problems.
- Compliance: Results are compared to allowable leakage rates, and detailed reports ensure systems meet code requirements.
Duct leakage testing not only saves energy but also extends HVAC system life and ensures better air quality.
Air Flow, Inc. Training Class – Duct Leakage For Engineers
How to Conduct Duct Leakage Testing
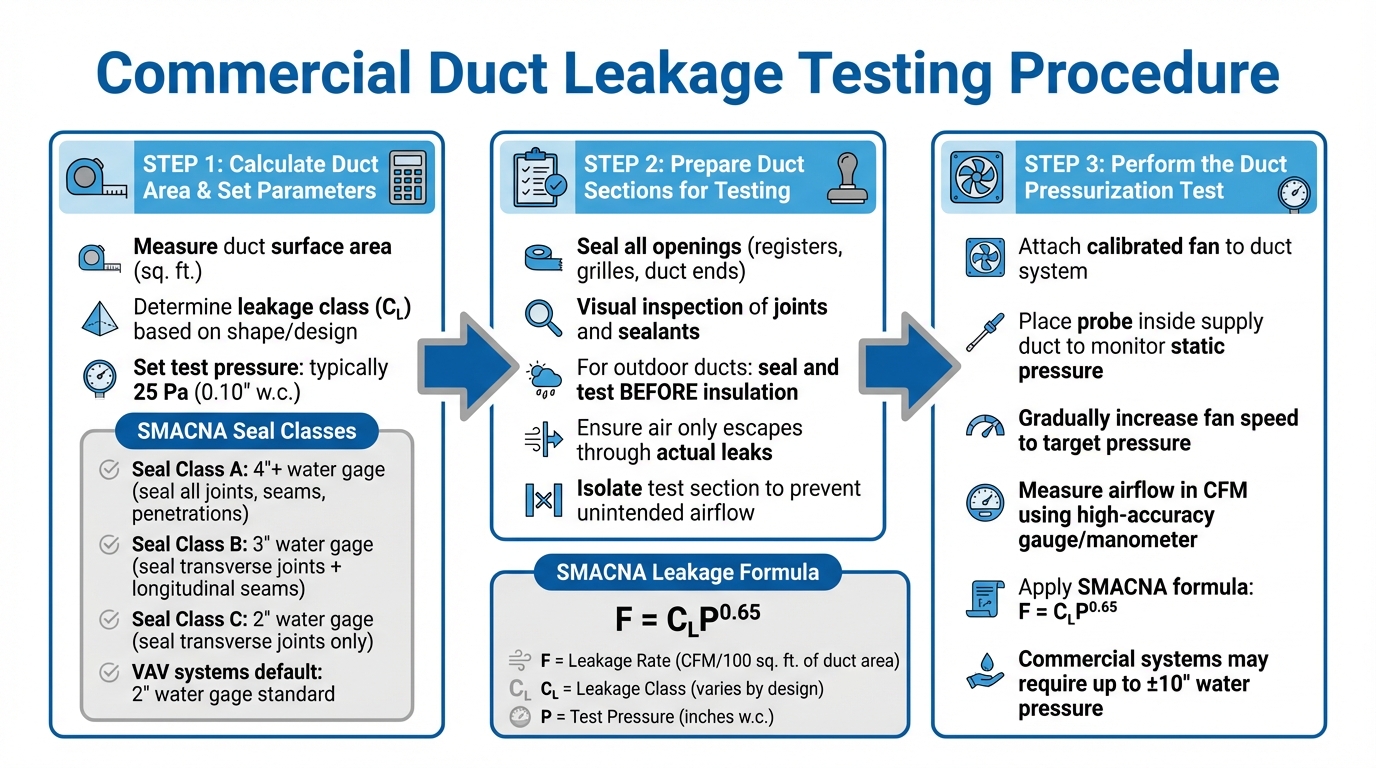
3-Step Duct Leakage Testing Process for Commercial HVAC Systems
Calculate Duct Area and Set Test Parameters
Start by measuring the surface area of the duct section in square feet. This measurement helps establish the allowable leakage rate according to SMACNA standards. Next, determine the duct’s leakage class (Cₗ), which depends on its shape and design specifications. The test pressure is based on the duct’s design pressure classification, typically 1", 2", 4", or 10" water gage. For testing purposes, 25 Pascals (around 0.10 inch water column) is commonly used as it simulates operating conditions.
SMACNA outlines three Seal Classes based on static pressure requirements:
- Seal Class A: Applies to ducts with static pressure of 4" water gage or higher. It requires sealing all transverse joints, longitudinal seams, and duct wall penetrations.
- Seal Class B: For systems with 3" water gage, sealing is needed for transverse joints and longitudinal seams only.
- Seal Class C: Used for systems with 2" water gage, requiring sealing of transverse joints only.
If no pressure class is specified for variable air volume (VAV) systems, ducts upstream of VAV boxes should be tested to a 2" water gage standard to ensure compliance.
Once these parameters are established, isolate the test section to prevent unintended airflow during testing.
Prepare Duct Sections for Testing
Before pressurizing the system, seal all openings such as registers, grilles, and duct ends. Perform a visual inspection of joints and sealants to ensure air can only escape through actual leaks, not through intentional openings. For ducts located outdoors, it’s better to seal and test them before adding insulation, as this makes it easier to identify leaks.
After sealing, the duct system is ready for pressurization and leakage measurement.
Perform the Duct Pressurization Test
Attach a calibrated fan to the duct system, either at the air handler or a central return grille. Place a probe inside the supply duct to monitor static pressure. Gradually increase the fan speed until the system reaches the target pressure. Use a high-accuracy gauge or manometer to measure the airflow, typically recorded in cubic feet per minute (CFM). This airflow rate represents the total leakage of the duct system.
SMACNA defines the leakage rate using the formula F = CₗP^(0.65), where P is the static pressure and Cₗ is the leakage class constant. For commercial systems, higher static pressures – sometimes up to ±10 inches of water – may be required, depending on the system’s design specifications.
Common Challenges and Solutions
Common Testing Problems
When conducting duct testing, several issues can crop up, potentially throwing off your results. One key step is to disable all mechanical systems – like ventilation units, timers, or VAV boxes – before starting. These systems can interfere with your readings and compromise accuracy. Another frequent problem is tape failure. Under pressure, tape can come loose, causing leaks. A quick fix? Briefly depressurize the system to help the tape settle into place and form a tighter seal.
If you’re seeing unstable gauge readings, it might mean your testing fan isn’t properly matched to the level of leakage in the system. In cases where the gauge doesn’t register the target pressure, you may need to adjust the fan’s hole size to better align with the leakage volume. Another complication comes from in-line equipment leakage. Components like dampers, access doors, and rod penetrations often leak, and manufacturers rarely provide leakage rate data for these items. According to SMACNA, designers should account for this type of leakage separately from the ductwork itself.
Post-test damage is another headache, especially in new construction. Ducts that pass initial rough-in tests can later be punctured or disconnected by other trades before the final inspection. On top of that, poor craftsmanship – like badly notched rectangular duct ends or compressed insulation at connections – often leads to unnecessary leaks.
These challenges highlight the importance of having a plan to address potential issues before they derail your testing process.
How to Get Accurate Results
To tackle these problems and ensure accurate results, there are some effective strategies you can use. For starters, smoke emitters are a great tool for spotting leaks when ducts fail to meet leakage targets. To zero in on which specific branches are contributing the most leakage, try using a pressure pan in combination with a blower door.
Always verify that the duct’s seal class aligns with SMACNA guidelines. Another tip: remote monitoring via smartphone apps can make the process much smoother. These tools allow a single technician to adjust fan speed while checking for leaks in hard-to-reach places like attics or crawlspaces, saving time and effort. Finally, pay close attention to mastic and duct boot seals during the rough-in phase. Catching issues early can help you avoid expensive fixes down the road.
How to Interpret Results and Create Reports
Compare Actual vs. Allowable Leakage
After completing the pressurization test, it’s time to compare your findings to the allowable limits. Duct leakage is measured in Cubic Feet per Minute (CFM) at a specific test pressure – commonly 25 Pascals (0.1 inches w.g.). This measurement is then normalized by dividing the CFM by the total conditioned floor area and multiplying by 100. To calculate the Actual Leakage Rate, use this same formula: divide the measured CFM by the conditioned floor area and multiply by 100.
When analyzing the results, be sure to factor in the relevant code requirements for your project. For example, the 2021 IECC provides different limits based on duct location. Systems entirely within the thermal envelope can have up to 8.0 CFM per 100 ft², while systems outside the envelope are capped at 4.0 CFM per 100 ft².
Joe Ophoff, a Certified HERS Rater at Scott Energy Services, notes, "Too much duct leakage can indicate a failure in the installation of the duct system, so we can catch a bad install at the ‘rough mechanical’ phase to ensure things are installed correctly."
For commercial systems, standards from SMACNA (Sheet Metal and Air Conditioning Contractors’ National Association) apply. These systems are assessed using Duct Leak Classes, which are determined by the duct’s pressure and sealing criteria.
Pass-Fail Criteria and Retesting
Once you’ve calculated the leakage rate, compare it to the project’s requirements to determine if the system passes. The process is straightforward: if the leakage rate is within or below the allowable limit, the system passes. If it exceeds the limit, you’ll need to locate and seal the leaks, often using tools like smoke emitters for accuracy, and then retest the system.
Keep in mind that testing criteria can vary depending on the stage of the project. For example, under the 2012 IECC, rough-in tests with the air handler installed allow up to 4 CFM per 100 ft², while tests without the air handler are limited to 3 CFM per 100 ft².
When multiple HVAC units are involved, it’s essential to evaluate leakage on a per-system basis in the compliance report.
Get Compliance Reports with Air Balance Masters
After successful testing and retesting, thorough documentation of the results is crucial for final approvals. Detailed compliance reports are often required to meet inspection standards and secure certificates of occupancy. Air Balance Masters offers comprehensive duct leakage testing reports tailored for commercial projects across MD, VA, PA, NJ, NY, DE, and DC. Their certified technicians use calibrated equipment to ensure accurate airflow measurements at specified test pressures.
These compliance reports include critical details such as project information, system identification, applicable test standards, equipment data, and clear pass/fail results. They also differentiate between total duct leakage and leakage to outdoors. Additionally, Air Balance Masters ensures visual verification, documenting that duct boots are properly sealed to finished surfaces using UL-listed mastic tape or mastic, as required by code. This level of documentation not only simplifies final inspections but also helps improve the overall performance of HVAC systems.
Test duct leakage before it costs you
Key Takeaways
Duct leakage testing plays a crucial role in maintaining energy efficiency and meeting regulatory standards in commercial buildings. The process involves using a calibrated fan to pressurize the system to 25 Pascals and measuring the airflow to identify leaks. Understanding the types of leaks is vital to addressing those that have the greatest impact on energy performance.
Conducting rough-in testing can save both time and money. By identifying and sealing leaks before drywall installation, contractors can reduce callbacks and adhere to ENERGY STAR requirements, which specify a threshold of 4 CFM25 compared to 8 CFM25 per 100 square feet.
Advancements in technology, such as smartphone apps, now allow for remote monitoring and automatic report generation. These tools not only simplify the detection of leaks but also ensure precise documentation, making compliance easier.
For reliable and efficient duct leakage testing, Air Balance Masters is a trusted choice. Serving MD, VA, PA, NJ, NY, DE, and DC, they provide accurate testing and comprehensive compliance reports. These reports include everything from system identification and applicable standards to clear pass/fail outcomes and visual evidence of sealed duct boots. This thorough documentation streamlines final inspections, helping contractors secure certificates of occupancy without unnecessary delays.
FAQs
How does duct leakage impact energy use and costs in commercial buildings?
Duct leakage in commercial buildings can have a noticeable impact on energy use and operational expenses. When air meant to heat or cool a space escapes through gaps in the ductwork, HVAC systems have to work overtime to maintain the set temperature. This extra effort translates into higher energy consumption and, ultimately, steeper utility bills.
Beyond just wasting energy, leaky ducts increase the demand for fan power and lead to heat loss, both of which add to the overall costs. Over time, these inefficiencies can become a financial headache for building owners and managers. To combat this, regular testing for duct leaks and ensuring proper sealing are critical steps. These measures not only cut down on energy waste but also help keep costs in check while boosting the performance of the HVAC system.
What role does duct leakage testing play in meeting energy codes and standards?
Duct leakage testing is an essential step in ensuring HVAC systems align with energy codes and standards by verifying that ductwork achieves the required level of airtightness. This process identifies air leaks that could cause energy waste, helping systems run more efficiently while meeting regulations like the International Energy Conservation Code (IECC).
By measuring total air leakage – including leaks into unconditioned spaces – this testing not only promotes energy efficiency but also reduces utility expenses. Additionally, it plays a key role in helping contractors pass final inspections, ensuring both performance and compliance in commercial buildings.
What tools and techniques can improve the accuracy of duct leakage testing in commercial buildings?
To ensure accurate duct leakage testing in commercial buildings, experts turn to specialized tools and precise testing methods. Duct leakage testers equipped with real-time monitoring capabilities can measure leakage rates, barometric pressure, and temperature, delivering reliable results. Similarly, blower door systems are instrumental in pressurizing ductwork to pinpoint leaks under controlled conditions. When paired with methods like the DeltaQ approach, which evaluates air leakage during normal system operation, these tools help minimize errors commonly associated with static testing.
For added accuracy, many professionals use duct traversal airflow measurement. This technique involves taking multiple velocity and pressure readings across the duct’s cross-section to provide a detailed assessment of airflow. By leveraging these advanced tools and methods, contractors can meet energy efficiency requirements and enhance HVAC system performance.


