


If I’m doing TAB work in a hospital, I can’t treat it like a normal HVAC job. I need to clear the ICRA permit, confirm barriers and pressure control, verify room performance, check filters and dust control, and document every reading by room and permit ID.
Here’s the article in plain terms:
- I start with the ICRA permit, risk class, scope, shutdowns, and work window
- I confirm barriers, anterooms, access approval, and negative pressure before testing
- I verify room performance for spaces like AIIRs, PE rooms, ORs, ICUs, and patient rooms
- I measure pressure, supply/exhaust airflow, ACH, and outdoor air
- I check filter condition, sealed openings, dust control, and HEPA units
- I log pass/fail results, deficiencies, room IDs, instrument data, and retest items
A few hard numbers stand out right away:
- AIIR pressure: -0.01 to -0.03 in. w.g.
- PE/OR pressure: +0.01 to +0.03 in. w.g.
- AIIR ACH: 12 ACH for new or renovated rooms, 6 ACH for existing rooms
- ICU ACH: 6 ACH
- Standard patient room ACH: 4 ACH
- OR ACH: 20 ACH
- A swing of 10% to 15% from past commissioning data should be flagged
What I like about this checklist is that it keeps the job tied to patient safety, not just airflow numbers. A room can “test” fine on paper and still fail the work area if barriers leak, doors are propped open, or filters bypass air.
My takeaway: before I take a single reading, I need to know the room type, the ICRA class, the pressure target, the barrier status, and who approved access. After that, every result has to be written down in a way that connects the reading to the room, the permit, and the issue log.
The rest of the article walks through those checks step by step in field order.
Hospital HVAC Design and Commissioning Training
Prework ICRA Checks Before TAB Field Testing
Complete these checks before any TAB measurement starts. This is the gate that clears the job for pressure, airflow, and filtration readings.
ICRA Permit, Risk Class, and HVAC Scope Review
Use the current signed ICRA permit as the field control document. Log the permit number on every TAB data sheet.
Then confirm the basics of the job:
- activity type
- affected patient risk group
- assigned ICRA class
- HVAC scope, including the air handlers, zones, diffusers, and return grilles involved
Also verify any required shutdowns, grille sealing or bagging, HEPA units, and negative-pressure setpoints before testing begins. If those details are fuzzy, stop and sort them out first. TAB work gets messy fast when the scope is only half clear.
For Class III and Class IV work, verify negative pressure, dedicated exhaust, and HEPA filtration before any balancing or ceiling access.
Barriers, Access, and Work Window Approval
Inspect all temporary barriers before TAB entry. That includes plastic sheeting, zip walls, or hard barriers. Confirm they run from the floor to the structural deck.
Watch the usual trouble spots:
- seams
- pipe penetrations
- ceiling edges
Those are the places where jobs tend to leak. If you find gaps, seal them before work moves forward.
If an anteroom is required, confirm both self-closing doors and clean-to-dirty airflow. If the anteroom door is propped open, the pressure relationship is lost and testing must stop.
Access approval must come from both Infection Prevention and Facilities Management. Confirm the approved work window in writing, including start and end times. Also ask whether any clinical use changes have happened since the permit was issued, such as turning a standard room into an AIIR. That one change can shift the whole testing setup.
Use a pre-shift huddle to confirm barrier integrity, anteroom status, and pressure alarms. Record the name, title, and timestamp of the person who grants access approval. Add that to the TAB commissioning record.
Table: ICRA Class vs. TAB Work Restrictions
| ICRA Class | Allowed TAB Activities | Required HVAC Precautions | Monitoring Frequency |
|---|---|---|---|
| Class I | Visual checks | Minimize dust; replace ceiling tiles immediately after access | Once per visit |
| Class II | Basic testing of supply flows and temperature checks | Standard barriers active; seal or bag affected grilles as required | Once per shift |
| Class III | Balancing and functional testing only after controls are verified | Full HVAC isolation of the work zone; critical barriers floor to deck; negative pressure active; HEPA exhaust units running and verified | Hourly pressure readings; document time and technician initials |
| Class IV | Physical entry limited; remote measurements preferred | Full-height critical barriers; anteroom; continuous negative pressure; HEPA filtration; restricted access | Continuous pressure monitoring; any alarm triggers work stop |
If site conditions do not match the ICRA class listed on the permit, stop work. For example, if the permit says Class III but there is no negative pressure and the barriers are not sealed, do not take readings. Document the mismatch with photos and pressure readings, then escalate it to Facilities and Infection Prevention before any testing begins.
With permits, barriers, and access confirmed, move to pressure-room and airflow checks.
Pressure Rooms and Ventilation Performance Checklist
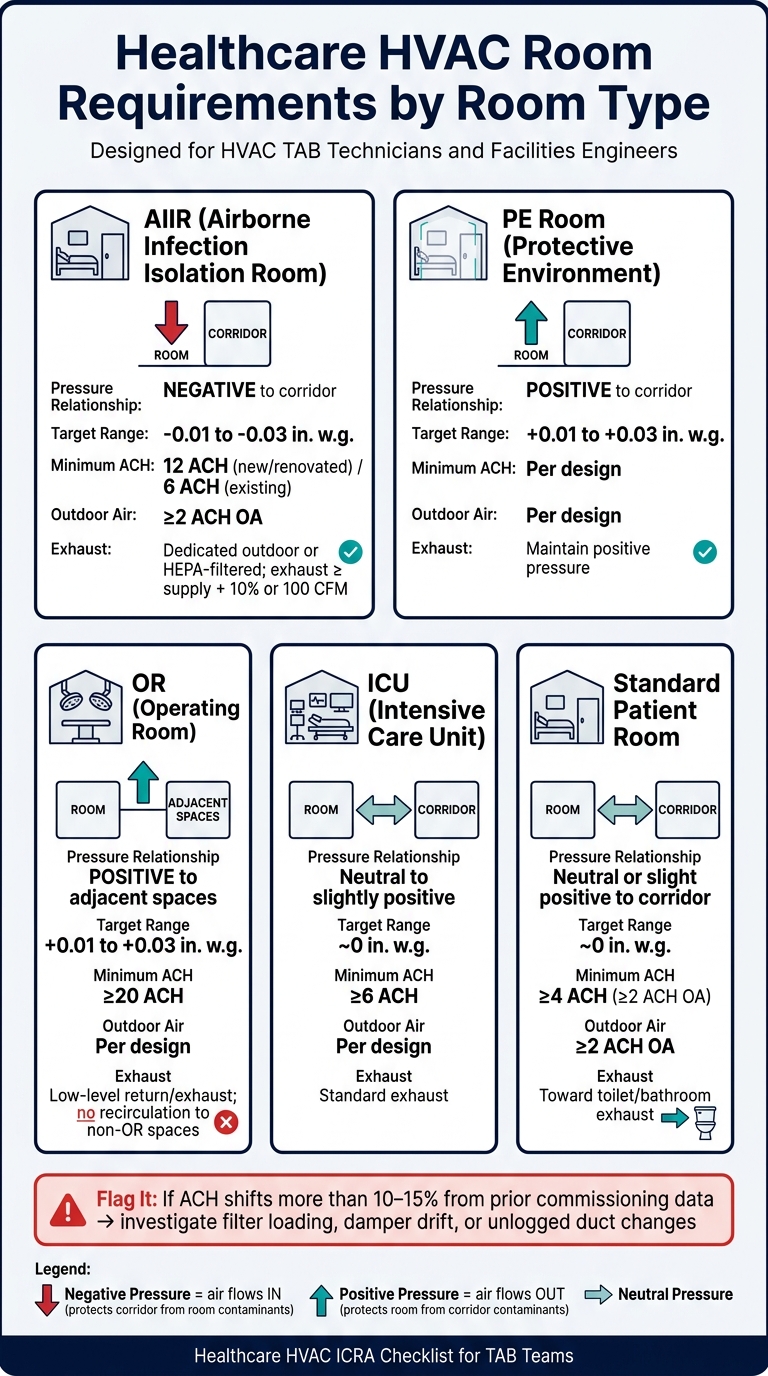
Healthcare HVAC Room Requirements: Pressure, ACH & ICRA Class at a Glance
After prework approval, the next step is simple: make sure each critical room performs the way it’s supposed to. Don’t clear a room until you’ve checked pressure, airflow direction, and how fast the room recovers.
Pressure Relationship Checks for AIIR, PE, OR, and Patient Care Spaces
Each critical room needs a calibrated digital manometer with a resolution of at least 0.001 in. w.g. Connect it to the room and the reference space, which is usually the corridor or anteroom. Take the first reading with the doors closed and the HVAC running under normal conditions. Then repeat the reading with the door half-open and fully open. After that, document the recovery time once the door closes.
Use these target ranges for common room types:
- AIIR: -0.01 to -0.03 in. w.g. relative to corridor; airflow direction from corridor into room
- PE room: +0.01 to +0.03 in. w.g. relative to corridor; airflow from room outward
- OR: +0.01 to +0.03 in. w.g. relative to adjacent spaces; supply from ceiling, returns at low level
Once you have the pressure readings, check directional airflow with smoke tubes at door undercuts and any other leakage paths. The smoke path matters just as much as the number on the meter. Record both in the ICRA/TAB record.
Also document pressure loss with the door open and the time it takes the room to recover. If a room does not restabilize right after the door closes, flag it.
For exhaust routing, physically trace the ductwork from AIIR and procedure room grilles. Confirm that it connects to a dedicated outdoor exhaust or a HEPA-filtered system. Check damper position, fan status, and whether the exhaust fan is tied to backup power and a failure alarm. Then use smoke to confirm the exhaust path and discharge direction.
ACH, Supply, Exhaust, and Outdoor Air Verification
After pressure direction checks out, move to airflow volume and outdoor air delivery. Measure supply and exhaust CFM at every outlet that serves the room. Use a calibrated flow hood, anemometer, or pitot tube. Add the readings to get total supply CFM and total exhaust CFM.
Then verify the room dimensions in feet: length, width, and ceiling height. From there, calculate room volume and use this formula:
ACH = (CFM × 60) ÷ Room Volume (ft³)
For AIIRs, base the ACH calculation on exhaust CFM. For PE rooms and ORs, use supply CFM. Compare the result with the project design and the minimums that apply: AIIR 12 ACH for new or renovated rooms and 6 ACH for existing facilities, ICU 6 ACH, standard patient rooms 4 ACH, and ORs 20 ACH.
For outdoor air, check the AHU serving the zone. Use a pitot traverse or the unit’s OA measurement station to confirm outdoor air CFM at the intake. Then apply the design OA fraction to estimate room-level OA delivery, and convert that number to OA ACH with the same formula. If calculated OA ACH falls below the design minimum, log it in writing. No hallway conversations, no loose notes. Tie the issue to the room ID and the AHU.
If ACH shifts by more than 10–15% from earlier commissioning data, flag it. That kind of swing usually points to filter loading, a damper that has drifted, or a duct change that happened without rebalancing the system.
Table: Room Type Requirements and Measured Results
Use the table below to compare design targets with measured results.
| Room Type | Design Pressure Relationship | Minimum ACH | Outdoor Air Requirement | Exhaust Requirement | Measured Value | Pass / Fail |
|---|---|---|---|---|---|---|
| AIIR | Negative to corridor (-0.01 to -0.03 in. w.g.) | ≥12 ACH (new); ≥6 ACH (existing) | ≥2 ACH OA | Dedicated outdoor or HEPA-filtered; exhaust ≥ supply + 10% or 100 CFM | _______ in. w.g. / _______ ACH | |
| PE Room | Positive to corridor (+0.01 to +0.03 in. w.g.) | Per design | Per design | Per design; maintain positive pressure | _______ in. w.g. / _______ ACH | |
| OR | Positive to adjacent spaces (+0.01 to +0.03 in. w.g.) | ≥20 ACH; filtration per design documents | Per design | Low-level return/exhaust; no recirculation to non-OR spaces | _______ in. w.g. / _______ ACH | |
| ICU | Neutral to slightly positive | ≥6 ACH | Per design | Standard exhaust; AIIR/PE variants follow respective requirements | _______ in. w.g. / _______ ACH | |
| Standard Patient Room | Neutral or slight positive to corridor | ≥4 ACH; ≥2 ACH OA | ≥2 ACH OA | Toward toilet/bathroom exhaust | _______ in. w.g. / _______ ACH |
Any fail goes straight to the issue log before the next phase of commissioning moves ahead.
Filtration, Dust Control, and Temporary Barrier Checklist
Once pressure and ACH are confirmed, move to the physical controls that can throw those readings off. This section is about checking the actual conditions behind the numbers and HVAC infection risks.
Filter Status and Opening Sealing Checks
Start at the filter bank. Make sure the installed filter type and MERV rating match the project specs and the ICRA plan. HEPA filters, rated at 99.97% efficiency at 0.3 microns, are used where the ICRA plan or design requires them.
Then inspect the filters themselves. Look for sagging media, dust bypass on the downstream side, or damage to the frame. Check gaskets, clamping hardware, and filter frames for gaps or warped edges, with extra attention on HEPA housings. For HEPA units, confirm the installation labels are in place and that any available DOP/PAO test records are present and current.
Inside the construction zone, inspect every supply diffuser, return grille, and transfer opening. Any opening that should be out of service needs to be physically sealed with rigid covers, blank-off plates, or taped plastic with no visible gaps at the edges. If the ICRA plan keeps HVAC service active, verify that temporary high-MERV or HEPA prefilters are installed at returns and that they have not reduced airflow past acceptable commissioning limits. Log any unprotected openings, open shaft penetrations, or disconnected flex branches as deficiencies.
Dust Control and Anteroom or Barrier Verification
Check barrier continuity again after ceiling access or filter work. For ICRA Class III–IV work, if ceiling tiles are removed inside the zone, the barrier must extend to the structural deck, and all penetrations must be sealed with fire-rated or infection-control-rated materials.
At each penetration – pipes, cable trays, ductwork, sprinkler heads – confirm the seal is continuous and intact. After that, test the anteroom doors. Open and close them several times. Make sure closers and sweep gaskets work, the doors do not bind, and simultaneous door openings do not cause a loss of the negative pressure measured in the previous section. Verify corridor-to-anteroom-to-zone airflow at the door undercut.
For dust control, note whether HEPA-filtered vacuums are being used, whether wet cleaning is active at the boundary, and whether tacky mats and doffing areas are set up at exits. Debris bags should be sealed, carts should be covered, and removal routes should stay out of active patient care areas. Document housekeeping conditions next to the pressure readings. Routine inspections using standardized checklists can help reinforce dust control protocols.
Record barrier and dust-control findings beside the measured room data.
Table: Barrier and Dust Control Verification by ICRA Class
| ICRA Class | Barrier Type | Airflow Requirement | Dust Control Measure | TAB Verification Item |
|---|---|---|---|---|
| Class I | No barrier required | Neutral; no pressure control | Dust mats at work area; localized cleanup | Confirm no open HVAC penetrations; note any visible dust at boundary |
| Class II | Soft barrier (plastic sheeting, floor-to-ceiling) | Neutral to slightly negative | HEPA vacuum; wet wipe surfaces; seal debris bags | Verify plastic is sealed at floor and ceiling; check supply/return protection |
| Class III | Full-height plastic or vinyl containment wall; sealed penetrations | Negative to adjacent areas; HEPA exhaust operating | HEPA vacuum only; wet cleaning; tacky mats at exit; covered waste carts | Measure differential pressure (in. w.g.); confirm HEPA exhaust unit running; log barrier gaps or unsealed penetrations |
| Class IV | Hard-wall barrier (drywall or modular panels) to deck; anteroom required; plastic alone not acceptable | Negative pressure; target at least –0.01 in. w.g. relative to corridor | HEPA vacuum; wet methods; dedicated egress route; scheduled waste removal; no dry sweeping | Record differential pressure with anteroom door closed and during movement; confirm HEPA unit filter status and operation; note any propped doors or unsealed penetrations |
Log each deficiency with the room or zone ID, date, and ICRA class. Tie barrier observations straight to the pressure readings from the previous section. If a Class IV zone cannot hold –0.01 in. w.g., review barrier continuity and penetrations. Carry those checks into the test record and issue log.
Test Records, Issue Logs, and Closeout Summary
Once pressure, ACH, filtration, and barrier checks are done, put them into a closeout package that links each result to the room and permit. After field checks, the goal is simple: create a full, traceable record that shows what was tested, where it was tested, and whether it passed.
Minimum Test Record Fields for ICRA-Related TAB Work
Each record must include the date in MM/DD/YYYY format, time, technician name, company, room ID and type, ICRA class or permit ID, measured values, test method, instrument, calibration date, the design target, and a clear pass/fail result.
For room naming, use the exact room ID and type, such as AIIR-310.
The record should also capture:
- Pressure differential in in. w.g. relative to adjacent spaces
- Supply and exhaust CFM
- Total ACH
- Outdoor ACH
- Temperature in °F
- Relative humidity in percent
Record the door position, barrier status, and operating speed too. That extra context matters. A room can test one way with the door closed and another way when conditions shift.
Use that same record set to open each deficiency entry. In plain terms, if something fails in the field, the test record should feed straight into the issue log.
Commissioning Issue Log and Escalation Items
Log every deficiency with an issue ID, room and system, finding, and failed criterion. Include the infection-control impact and occupancy impact. Then name the responsible party, whether that’s the mechanical contractor, controls contractor, or TAB firm.
Also document any interim mitigation, set a target retest date, and note the planned verification method. That way, the log does more than list problems. It shows what happens next.
Some items need immediate escalation:
- Failed AIIR negative pressure
- Low critical-room ACH
- Filter bypass
- Barrier breach into occupied areas
Those aren’t the kind of issues to leave sitting in a spreadsheet until the next meeting.
Conclusion: Core Checks TAB Teams Must Not Miss
Complete records and a structured issue log turn field measurements into a closeout package that can stand up to final signoff. Air Balance Masters can help standardize TAB documentation for final approvals in MD, VA, PA, NJ, NY, DE, and DC.
FAQs
When should TAB work stop under ICRA?
TAB work should stop or pause under ICRA if the mechanical system isn’t fully ready for testing.
Before work moves ahead, technicians should confirm that:
- the building envelope is complete
- penetrations are sealed
- doors and windows are installed
- equipment is fully operational under system control
If any of those conditions aren’t met, or if major deficiencies show up, pause the work until the construction team fixes the issues and completes a backcheck. That backcheck should confirm the system can meet design specifications within +/- 10%.
How do I calculate ACH for a hospital room?
Calculate Air Changes Per Hour (ACH) by taking the total supply air in CFM, multiplying it by 60, and then dividing by the room volume in cubic feet.
To measure total supply air, use a capture hood at ceiling diffusers. For low-velocity airflow, a thermal anemometer is usually the better fit. Either way, make sure the instrument is calibrated so your reading is accurate.
What must be documented in ICRA TAB reports?
ICRA TAB reports should document the key data needed to verify system performance and compliance.
That usually includes:
- Design vs. actual CFM at each outlet
- Room pressure differentials and verified ACH
- Fan RPM, amperage, and static pressure
- Testing instrument calibration details and serial numbers
The report should also include any identified deficiencies, the corrective actions taken, and status updates in a Deficiency Resolution Log.


