


A negative pressure room passes only if four checks line up: pressure stays at or below -0.01 in. w.g. (-2.5 Pa), air moves into the room, the room monitor matches the field reading, and ventilation hits 12 ACH for new or renovated AIIRs or 6 ACH for existing ones.
If I had to sum up the process in one line, it would be this: set the room to normal use, measure pressure, confirm inward airflow, verify CFM and ACH, then log and retest any failure. That’s what tells me the room can hold contaminants before patient use.
Here’s the full flow in plain English:
- Step 1: I set the room up in normal occupied mode and check the test tools.
- Step 2: I measure room-to-corridor pressure and run a smoke or tissue check at the door.
- Step 3: I measure supply and exhaust airflow, then calculate ACH = (CFM × 60) ÷ room volume.
- Step 4: I log each reading, each condition, and each pass/fail result.
- Step 5: I fix the cause of any failure and retest until pressure, airflow direction, and ACH all pass.
A few numbers matter most:
- Minimum pressure target: -0.01 in. w.g.
- Airflow direction: corridor → room
- Exhaust offset: about 10% more exhaust or 50 CFM more, whichever is greater
- ACH target: 12 ACH for new/renovated AIIRs, 6 ACH for existing rooms
| Check | What I confirm | Typical pass point |
|---|---|---|
| Pressure | Room is negative to adjacent space | -0.01 in. w.g. or lower |
| Air direction | Air moves inward at openings | Inward flow at door |
| Monitor | Fixed display matches field check | Reading is active and in line with handheld test |
| Ventilation | Airflow supports containment | ≥12 ACH new/renovated, ≥6 ACH existing |
If even one of these fails, the room should not be treated as ready for use.
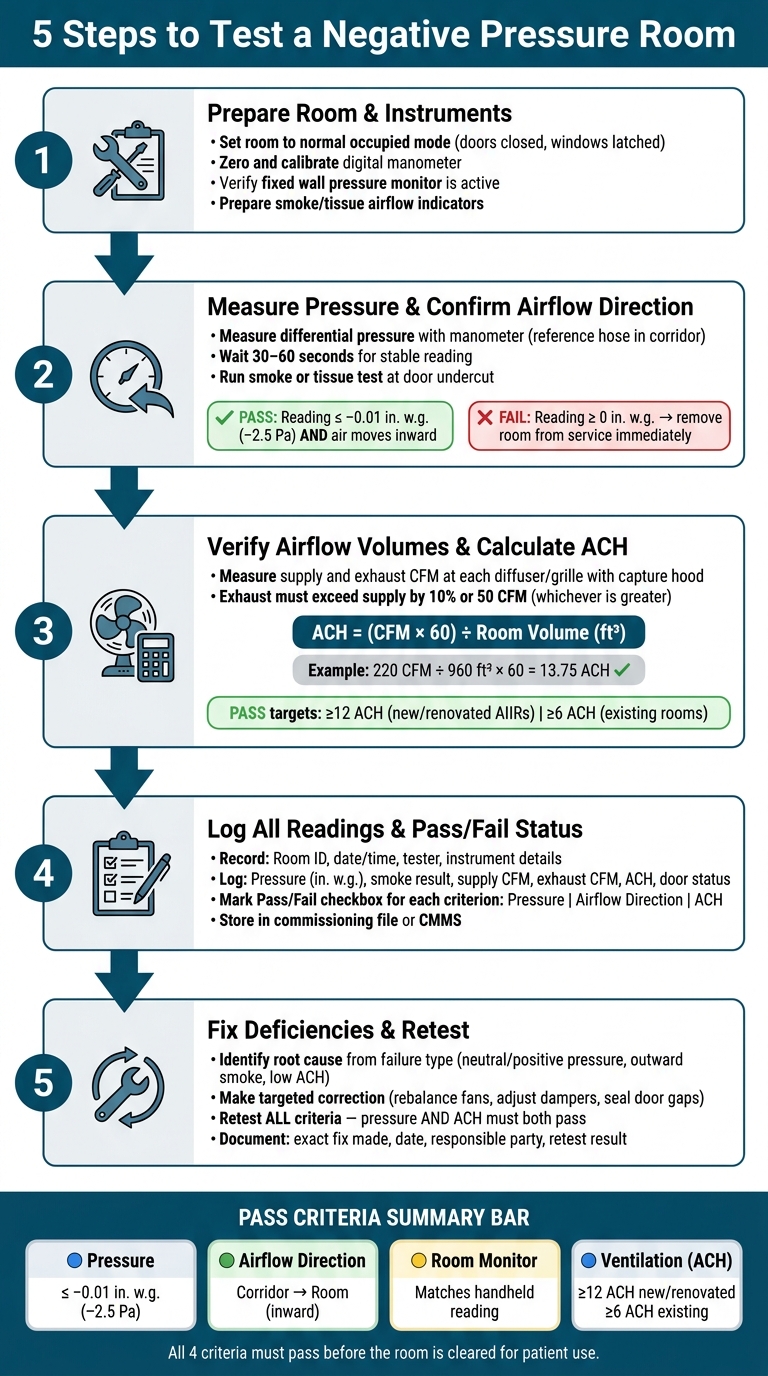
5 Steps to Test a Negative Pressure Room: Key Checks & Pass Criteria
Paper test for Air Negative room
Step 1: Prepare the Room and Check Test Instruments
Before you take any reading, set the room to its normal occupied condition. Keep doors closed, windows latched, and transfer devices in their usual operating position. Run the supply and exhaust systems as they would run during day-to-day use, not in a construction mode or on a temporary bypass. Then give the space time to settle. This matters because unstable room conditions can hide a containment problem.
Confirm Safe and Valid Test Conditions
Before entering, check whether the room is occupied and ask infection control staff about any limits. If the test calls for cracking a door open for a smoke check, infection control may set PPE rules or tell you when the test can happen, such as between aerosol-generating procedures. Before testing starts, record the room number, occupancy status, HVAC operating mode, and the name of the infection control contact.
Give the connected spaces the same level of attention. If the room has an anteroom, close both doors and check that the self-closing hardware works. If there’s a toilet room tied to the space, make sure its exhaust is on and its door is in the normal position. A failed exhaust fan there can weaken the negative pressure in the main room.
Look at the corridor too. A propped-open window, a temporary fan, or some other odd setup can throw off the pressure cascade and skew the test.
Getting the room conditions right before you pull out an instrument is the difference between a valid test and a bad read.
Check Manometers, Monitors, and Airflow Indicators
For AIIR differential pressure readings at about −0.01 in. w.g. (−2.5 Pa) or lower, use a calibrated digital manometer or micromanometer. Turn it on, let it warm up, and zero it before you connect the tubing. Check the tubing, confirm the hose setup is correct, place the reference hose in the corridor, and expose the measurement port to the isolation room. Then set the unit to the needed scale – Pa or in. w.g. – and check the battery and calibration date.
Next, look at the fixed room pressure monitor on the wall. Make sure it has power, shows a reading, and uses the right setpoints. Compare that reading with the handheld instrument while conditions are stable. If the two don’t match, treat the room as suspect and flag the sensor for recalibration before moving on.
Last, get the airflow indicators ready – smoke, tissue, or a flutter strip. Do a quick function check in a neutral area before entering the room. These tools help confirm airflow direction at the door, so they should be ready to go before the test starts.
Once the room and instruments are set, you can measure pressure and confirm airflow direction.
Step 2: Measure Room Pressure and Confirm Airflow Direction
After setup, you need to make sure the room still performs under normal HVAC conditions. That means recording two things: a pressure reading and a visual airflow check. You need both if you want results that stand up when contractors, engineers, and facility teams review them.
Take Differential Pressure Readings with a Manometer
With the door closed, route the tubing so one port samples the room and the other samples the corridor or anteroom. Don’t pinch the line. One port should stay in the room, and the other should stay in the corridor or anteroom.
Use a calibrated digital or analog manometer that can read low pressure in inches of water gauge (in. w.g.), and, if available, Pascals (Pa). Once the HVAC system is running as it normally does and the door is closed, let the reading settle for at least 30 to 60 seconds. If the system cycles, wait longer and take a few readings over several minutes to make sure the number stays steady.
Record the reading in in. w.g., with Pa in parentheses. Also note the door position and HVAC status. If the reading drifts or turns positive, stop there and check the room before you continue.
Run a Smoke or Tissue Test at the Door
After you have the pressure reading, check airflow direction with a visual test. Hold smoke or tissue near the door undercut or edge without blocking the opening. Release a small amount of smoke, or let the tissue hang loose. If the room is under negative pressure, both should move inward.
If there’s an anteroom, test both doors. You want to confirm airflow moves corridor → anteroom → room. Write down what you see at each doorway and whether it lines up with the manometer reading.
Pressure Reading Interpretation Table
Compare the measured pressure to your project criteria.
| Measured Pressure | Interpretation | Next Action |
|---|---|---|
| ≥ 0 in. w.g. (≥ 0 Pa) | Critical fail – room is neutral or positive | Notify facility management and infection prevention at once; remove the room from service; start HVAC troubleshooting |
| -0.001 to -0.009 in. w.g. (-0.25 to -2.2 Pa) | Fail – below the minimum | Check exhaust airflow, supply balance, door seals, and system settings; retest after corrections |
| -0.01 to -0.03 in. w.g. (-2.5 to -7.5 Pa) | Pass / compliant – meets the typical minimum when it matches project design | Record the reading, confirm with a smoke or tissue test, and continue monitoring |
| More negative than -0.03 in. w.g. (down to about -0.05 in. w.g.) | Pass with operating margin – extra negative pressure stability | Document the extra margin, verify door operation, and watch for drafts or noise |
If the manometer result and the visual check don’t match, repeat both tests. Then verify calibration, tubing placement, and any cross-drafts that could be throwing things off.
If pressure and airflow direction both pass, move to airflow volume and ACH testing in Step 3.
Step 3: Verify Airflow Volumes and Calculate ACH
A passing pressure reading from Step 2 shows the room is negative at that moment. But pressure by itself doesn’t prove the room can keep containment in place. Step 3 checks whether there’s enough airflow behind that pressure to make it hold.
Measure Supply and Exhaust Airflow in CFM
Measure each accessible supply diffuser and exhaust grille with a capture hood using a full-face seal. If a hood won’t fit because of ceiling access, diffuser shape, or obstructions, use a vane or hot-wire anemometer instead. Take several velocity readings across the grille face, find the average, and multiply that number by the grille’s effective free area to estimate CFM.
Record the terminal, the instrument used, its calibration date, and the measured CFM for each reading. Then add up total supply CFM and total exhaust CFM for the room.
Exhaust needs to be higher than supply. The target is 10% more exhaust, or 50 CFM, whichever is greater.
Calculate ACH Using Room Volume
Multiply length × width × height to get room volume in cubic feet. A room that measures 12 ft × 10 ft × 8 ft has a volume of 960 ft³.
Use the standard formula:
ACH = (CFM × 60) ÷ Room Volume (ft³)
Use the airflow basis listed in the design documents, which is usually exhaust CFM. For example, if exhaust airflow is 220 CFM in the 960 ft³ room above:
ACH = (220 × 60) ÷ 960 = 13.75
Now compare that result with the project target. In your report, spell out which airflow value you used: exhaust, supply, or outdoor air. That small detail matters. If someone reviews the numbers later, they need to know exactly how you got there.
ACH and Pressure Status Reference Table
Pressure and ACH need to be read together. One without the other can send you in the wrong direction.
| Compliance Status | Pressure Differential | ACH Result | Likely Cause |
|---|---|---|---|
| Fully Compliant | Meets required negative range | Meets or exceeds target | Supply and exhaust balanced per design |
| Pressure Pass, ACH Fail | Meets required negative range | Below target | Exhaust too low; check fan speed, filter loading, or damper position |
| ACH Pass, Pressure Fail | Not consistently negative or occasionally positive | Meets or exceeds target | Supply too high; door undercut blocked; pressure control needs adjustment |
| Non-Compliant | Not negative or positive | Below target | Mechanical imbalance: undersized fans, closed dampers, clogged filters, or exhaust off during occupancy |
If the room lands in the ACH Pass, Pressure Fail category, the answer is often a balancing adjustment, not a full system replacement. A small drop in supply CFM or a modest bump in exhaust CFM can bring the pressure offset back while keeping ACH above the minimum. A certified TAB provider can document the final adjustment and retest.
Use these results to move into deficiency correction in Step 4.
Steps 4 and 5: Record Results, Fix Deficiencies, and Maintain Compliance
Log Readings, Indicators, and Pass or Fail Status
Once the room has been tested, record the results and fix any failures before closeout. This part matters more than people think. A clear log makes review easier and gives your team something solid to compare against later.
Record:
- Room ID, building, floor, date and time
- Tester and company
- Instrument details
- Differential pressure in in. w.g.
- Smoke/tissue result
- Supply and exhaust CFM
- ACH
- Door position and closure status
- Any anomalies
Put the acceptance criteria directly on the form too: target pressure, minimum ACH, and airflow direction. A Pass/Fail checkbox for each criterion – pressure, airflow direction, and ACH – plus one final overall determination keeps the record clean and easy to scan.
Store completed logs in the facility’s commissioning file or CMMS, linked to the specific room. That way, future maintenance visits and retests have a clear baseline.
Fix Common Failure Conditions and Retest
Use the failed reading to trace the cause, make the fix, and then retest the room. Start with the most likely issue first.
| Failure Scenario | Probable Cause | Priority Corrective Action |
|---|---|---|
| Room reads neutral or positive | Exhaust CFM too low or supply CFM too high | Verify fan operation, open dampers, rebalance supply/exhaust |
| Smoke or tissue moves outward at door | Door closure or frame leak | Adjust door hardware, add door sweep, seal frame gaps |
| Pressure unstable | BAS control instability or VAV hunting | Check BAS setpoints, tune controls, verify sensor placement |
| ACH below design requirement | Insufficient exhaust or supply airflow | Correct fan speed or damper positions, rebalance |
| Measured CFM lower than past readings | Filters clogged or grilles blocked | Replace filters, remove obstructions, clean grilles |
| Calibration or zeroing error | Uncalibrated or improperly zeroed test equipment | Verify calibration, re-zero instruments, repeat measurements |
After each fix, retest for both pressure and ACH. Don’t stop after one good-looking number. If pressure looks right but ACH is still low, the room still has a problem.
Document the corrective action with the exact change made, such as "VFD speed increased from 40% to 55%, door sweep installed," along with the date, responsible party, and retest result. That audit trail – initial failure, documented fix, verified retest – is the kind of record AHJs often look for during final inspection file review.
Once the room passes retest, file the final report in the commissioning record.
Use Certified TAB Support for Final Verification
If in-house adjustments don’t fix the deficiency, or the project needs third-party documentation for a certificate of occupancy, bring in a certified TAB firm.
Air Balance Masters provides TAB services, deficiency reporting, and certification services for HVAC and general contractors across MD, VA, PA, NJ, NY, DE, and DC, supporting final inspection approval.
FAQs
How often should a negative pressure room be retested?
Negative pressure rooms should get a full re-TAB when facility changes affect more than 30% of duct or piping capacity.
ASHRAE 62.1 also recommends a routine TAB audit every 5 years. That check helps catch performance drift caused by aging equipment or spaces that have been repurposed.
Seasonal testing matters too. Check heating systems in winter and cooling systems in summer to make sure they still meet design specs under peak loads.
What can cause a room to fail even if pressure looks acceptable?
A room can fail a negative pressure test even when the first reading looks fine. The reason is simple: the system may not hold the needed pressure difference over time.
A few issues tend to cause this:
- Unsealed penetrations
- Poorly installed doors or windows
- Duct leaks
- Dirty filters or coils
- Restricted airflow from ducts that are the wrong size
- Unstable pressure caused by fan, control, or sensor problems
So the problem isn’t always the first measurement. In many cases, it’s the room’s ability to keep that pressure difference steady.
When should a certified TAB firm be brought in?
A certified Testing, Adjusting, and Balancing (TAB) firm should come in after all mechanical systems are fully installed, up and running, and performing as designed, but before the building is occupied.
That timing matters. It helps confirm the HVAC system is doing what it’s supposed to do, reduces the chance of delays during final inspection, and supports the Certificate of Occupancy process.
Certified TAB services also matter beyond new construction. They’re often needed for retrofits and for stubborn building issues like poor indoor air quality or uneven temperatures from one area to another.


