


Proper preparation is the key to ensuring your HVAC system operates efficiently and delivers consistent airflow across all zones. Air balance testing ensures your system meets its design specifications, enhancing performance, reducing energy waste by up to 25%, and extending equipment lifespan. Here’s how to get your system ready:
- Plan Ahead: Hold a pre-balancing meeting with all stakeholders to create a clear testing plan, review design documents, and set up a deficiency resolution log.
- Inspect the System: Check ductwork, dampers, and equipment for issues like leaks, obstructions, or incomplete installations. Ensure all components are clean, accessible, and functioning.
- Verify Equipment: Test fan speeds, motor performance, and calibration of sensors. Ensure the system is operating at design conditions.
- Prepare Tools and Documentation: Gather calibrated instruments like flow hoods and micromanometers. Organize design documents and pre-fill test sheets for faster fieldwork.
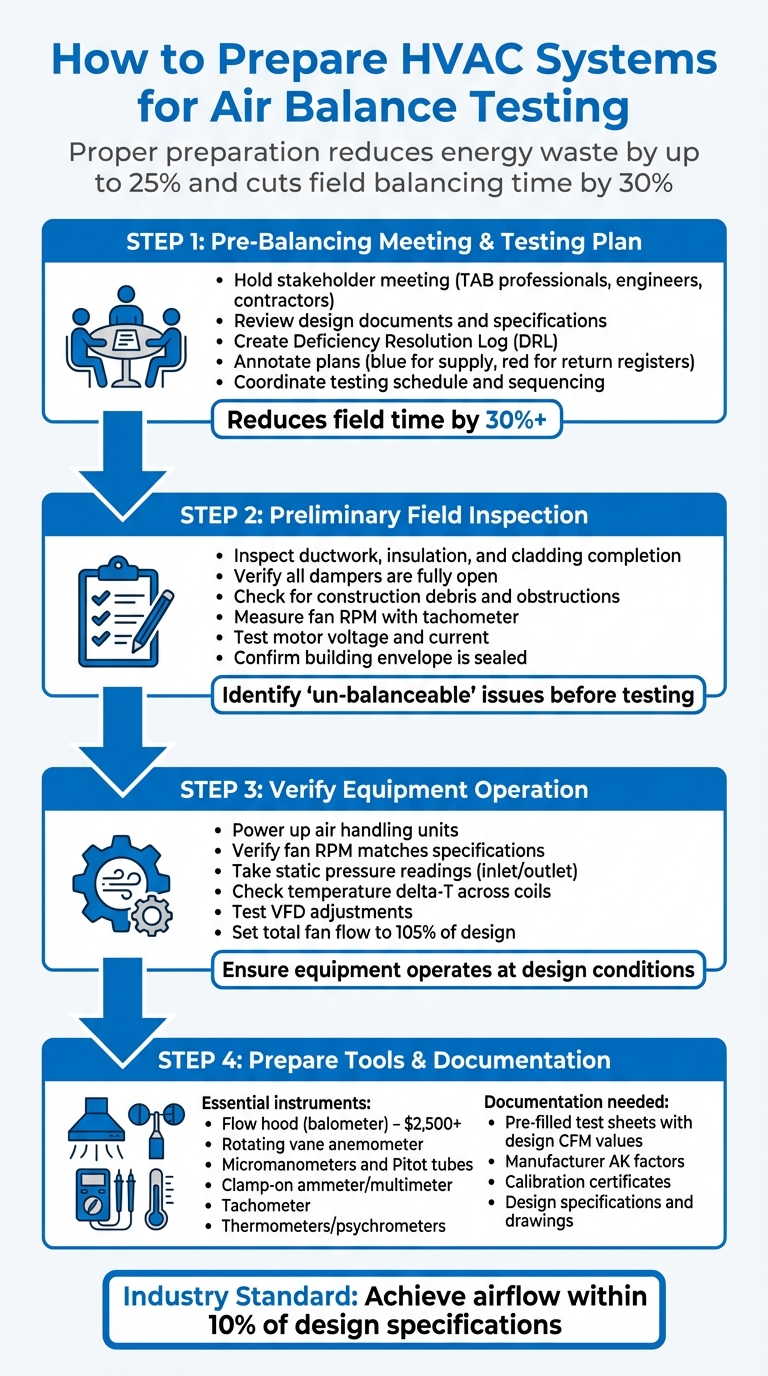
4-Step HVAC Air Balance Testing Preparation Process
HVAC – Air Side: Air Balance Basics for Commercial Facilities
Step 1: Hold a Pre-Balancing Meeting and Create a Testing Plan
Before any equipment is deployed, it’s crucial to bring together all key players – TAB professionals, engineers, and contractors – for a pre-balancing meeting. This meeting lays the groundwork for a smooth testing process. As Engineered Air Balance explains:
"The best way to integrate the TAB process into the project schedule is by providing a well-documented plan to the construction team during the planning phase, long before the TAB team arrives on site".
During the meeting, confirm that the system is ready for testing. This includes verifying that mechanical installations like ductwork, insulation, and cladding are complete, and ensuring that HVAC equipment commissioning is on track. Another key step is setting up a Deficiency Resolution Log (DRL) to document any deviations from the design and to outline how issues will be communicated and resolved.
Review Design Specifications and Project Requirements
Once the meeting objectives are clear, dive into the design documents to confirm all system specifications. Go over project plans, specifications, and the design intent with everyone involved. Each terminal and piece of equipment should have documented design CFM and temperature requirements. Without this crucial data, balancing becomes a guessing game. Make sure all necessary information is available and that the engineering design intent is well understood.
To streamline the process, annotate the plans by numbering registers in the order they’ll be tested. Use blue for supply registers and red for return registers. This small step helps the team get familiar with the layout before arriving on-site. Rob ‘Doc’ Falke, President of the National Comfort Institute, emphasizes its importance:
"Good balancers agree this step reduces their balancing time in the field by 30% or more and acquaints them with the job so they are familiar with the project before they arrive onsite".
Coordinate System Sequencing and Testing Schedule
Create a detailed timeline that outlines manpower needs, the duration of each test, and the order in which tasks will be carried out. Identify which tests can be done simultaneously and which need to be done one after the other. For example, balancing the air system often needs to happen before hydronic or steam systems because the air system’s performance directly affects the load on water-side systems.
Make sure the building control system is fully functional and that all dampers – including fire and smoke dampers – and VAV boxes are fully open, as outlined in earlier preparation steps. If spaces aren’t sealed, maintaining proper pressure and temperature control becomes nearly impossible, especially in critical areas like operating rooms.
Step 2: Complete a Preliminary Field Inspection
With your pre-balancing plan in hand, it’s time to conduct a detailed field inspection. After wrapping up your pre-balancing meeting and testing plan, take a walk through the site to examine the physical system. This step is essential for identifying "un-balanceable" issues – like disconnected ducts, missing dampers, or open redundant openings – that can make proper air balancing impossible. As Jason Rende, an HVAC Designer and Air Balancing Specialist, explains:
"Air balancing is a critical step in HVAC commissioning that often gets overlooked until problems arise".
Spotting these issues now, before testing begins, can save you significant time and prevent costly rework. Once you’ve addressed these concerns, shift your focus to inspecting the system’s physical components to ensure everything is installed correctly.
Inspect Ductwork and System Components
Start by confirming that all ductwork, insulation, and cladding are complete. As you walk through the building, check that the envelope is sealed tightly – doors, windows, and suspended ceilings should all be properly fitted to prevent unintended air leakage. Verify that all volume dampers, splitter dampers, VAV boxes, and fire dampers are in the fully open position to allow for maximum airflow during testing. Look inside accessible duct sections for any construction debris or obstructions that could disrupt airflow and throw off sensor readings. Also, confirm that test holes have been drilled in the correct locations for taking accurate measurements.
Verify Fan and Motor Functionality
After inspecting the ductwork, shift your attention to the mechanical components. Use a tachometer to measure the fan’s RPM and compare it to the manufacturer’s specifications. Running a fan at the wrong speed can overload the motor and lead to premature equipment failure. Double-check the fan’s rotation direction to ensure it’s moving air in the intended direction. Measure the motor’s voltage, current, and nameplate horsepower using a clip-on ammeter. For systems equipped with Variable Frequency Drives (VFDs), make sure the fan speed adjusts correctly in response to duct pressure sensors. Rob ‘Doc’ Falke, President of the National Comfort Institute, offers this insight:
"Measurement with an air-balancing hood alone is insufficient to balance a system. Additional testing is essential… These tests include total external static pressure, fan speed, temperature change through the equipment, and electrical measurements".
Confirm Cleanliness and Accessibility
Before testing begins, clean or replace all filters and strainers. Dirty filters can create artificial pressure drops, skewing your readings and masking the system’s true performance. Ensure that VAV boxes, dampers, and air terminals are easily accessible. If access is clear, you can use a direct-reading balometer to take instant volume measurements. In cases where access is restricted, you may need a rotating vane anemometer, which requires time-consuming velocity-to-volume conversions. Finally, confirm that furniture, architectural features, or suspended ceilings are not blocking access points. A clean and accessible system helps you distinguish between genuine mechanical imbalances and simple maintenance issues, like clogged coils.
Step 3: Verify Equipment Operation and Calibration
After completing the field inspection and ensuring the system is physically ready, the next step is to power up the equipment and confirm it’s operating at its intended design conditions. This step is crucial for distinguishing systems that merely appear ready from those that are genuinely prepared for precise air balance testing.
Start Equipment and Check Performance Metrics
Turn on the air handling units and use a tachometer to verify that the fan’s RPM aligns with the manufacturer’s specifications. As noted by Method Statement HQ, "Ensure that the fan speed (RPM) is within the limits specified by the manufacturer to avoid over loading". Take static pressure readings at both the fan’s inlet and outlet. Measure the inlet pressure upstream of any flexible connections and the outlet pressure at a point before any duct restrictions.
Check the temperature difference (delta-T) across the coils to confirm performance. Use an ammeter to measure the motor’s voltage and current, comparing these readings to the nameplate data to ensure the equipment isn’t consuming excessive power. For systems with Variable Frequency Drives (VFDs), confirm that the fan speed adjusts properly based on pressure sensor feedback in the supply air duct. These steps ensure the system is fully operational and ready for accurate air balancing, a crucial step before moving on to parameter adjustments.
Adjust Dampers and Set Operating Parameters
With the equipment running correctly, prepare the system for balanced conditions. Open all volume, splitter, and fire dampers completely, and confirm that the building envelope is sealed – doors, windows, and suspended ceilings should be closed to create an "airtight" environment. This setup allows control components, like thermostats, to maintain the desired conditions during testing.
For the initial setup, many technicians set the total fan flow to 105% of the design flow before beginning proportional balancing. This slight over-adjustment provides flexibility to redistribute air without depriving any zones. Record key metrics such as static pressures, coil temperatures (on and off), and relative humidity to document system performance. Once these parameters are verified and logged, the system is ready for the testing phase. As HVAC Designer and Air Balancing Specialist Jason Rende emphasizes, "Every forced air system should be balanced upon initial startup… air balancing ensures that correctly sized equipment performs as designed".
Step 4: Prepare Tools and Documentation for Testing
Before diving into testing, it’s crucial to have all the necessary tools calibrated and the design documents fully prepared. This ensures you can accurately measure and verify the system’s performance without unnecessary delays.
Gather Testing Instruments and Equipment
Air balance testing calls for specific tools to get precise measurements. Here’s a breakdown of what you’ll need:
- A flow hood (balometer) is essential for measuring CFM (cubic feet per minute) at commercial diffusers and grilles. Keep in mind, high-quality flow hoods often cost upwards of $2,500.
- For residential registers or areas with limited access, a rotating vane anemometer works well. It provides velocity measurements that can be converted to volume using manufacturer-provided AK factors.
- Micromanometers and Pitot tubes are used to measure static pressure, differential pressure, and total airflow through duct traverses.
- A clamp-on ammeter or multimeter helps measure motor current, voltage, and capacitance, while a tachometer checks the RPM of fans and motors.
- Finally, thermometers or psychrometers are needed to measure dry-bulb and wet-bulb temperatures, delta-T, and humidity levels.
Before heading to the job site, confirm that all electronic instruments have up-to-date calibration certificates. As Rob ‘Doc’ Falke, President of the National Comfort Institute, emphasizes:
"Good commercial hoods cost around $2,500 or more. Obtaining good readings with any hood requires a working knowledge of measuring system performance".
Organize Design Documents and Reports
With your tools ready, it’s time to get your paperwork in order. Pre-organizing your design documents can save significant time in the field – some estimates suggest it can cut balancing time by over 30%.
Start by compiling all the necessary design specifications, including duct calculations, layout drawings, and equipment submittals. Pre-fill air balance reports in advance with design CFM values, room names, and equipment model numbers. This preparation ensures you spend less time on administrative tasks during testing.
Additionally, make sure to gather manufacturer data for AK factors, as these constants are critical for converting velocity readings into accurate CFM measurements. Without the correct AK factor for each grille model, your airflow calculations may be off. Prepare test sheets formatted to record design versus actual CFM, static pressures, and electrical data, and ensure you’re using approved forms that align with project requirements.
Prepare the system before the balancer arrives
Getting your HVAC system ready for air balance testing is key to ensuring it runs efficiently and reliably over the long haul. By organizing pre-balancing meetings, conducting detailed field inspections, verifying equipment functionality, and having the right tools and documentation on hand, you’re setting the stage for systems to work exactly as designed. This level of preparation can lead to noticeable performance improvements and a longer system lifespan.
Proper preparation goes beyond just ticking off compliance boxes. It helps prevent issues like premature equipment breakdowns, uneven heating or cooling, and poor indoor air quality. Plus, it makes field operations smoother. As air balancing expert Jason Rende explains:
"Proper air balancing ensures that correctly sized equipment performs as designed".
When done right, preparation not only ensures compliance but also reduces callbacks, speeds up project timelines, and leaves clients pleased with systems that meet both regulatory and performance expectations.
Hitting the industry standard of airflow values within 10% of design specifications doesn’t happen by chance – it starts with the groundwork. Clean filters, open dampers, calibrated tools, and thorough documentation transform air balancing into a precise and repeatable process.
Ultimately, thorough preparation means you’re not just passing inspections. You’re delivering an HVAC system that runs efficiently, keeps energy costs in check, and ensures comfort for building occupants for years to come.
FAQs
What steps should I take to prepare an HVAC system for air balance testing?
To get your HVAC system ready for air balance testing, start by making sure all ductwork is fully installed, inspected, and free of any damage. If repairs are needed, handle them beforehand. Confirm that key components like air handling units (AHUs), fan coil units (FCUs), and exhaust fans have been pre-commissioned and are working as they should. Also, ensure insulation and cladding are complete, and that there’s clear access to all system components.
Double-check that all instruments, sensors, and controls are installed correctly based on the approved design drawings. Before beginning the testing process, gather all necessary design documents, such as airflow specifications, and have the right measurement tools ready. Taking these steps will set you up for accurate and efficient air balance testing.
How does air balance testing improve HVAC efficiency and lifespan?
Proper air balance testing is crucial for making sure that airflow levels align with the system’s design specifications. This precise alignment helps lower energy use, avoids overworking system components, and ensures consistent temperature distribution throughout the space.
By fine-tuning the system’s performance, air balance testing boosts HVAC efficiency while reducing wear and tear, which can extend the system’s lifespan. Performing these tests regularly is an essential part of keeping the system dependable and cost-efficient.
What tools and documents do I need for accurate HVAC air balance testing?
To perform accurate air balance testing, it’s crucial to have the proper tools and documentation at your disposal. Essential tools include a vane anemometer or flow hood (balometer) for measuring airflow (CFM), a micro-manometer for checking static pressure, a tachometer to verify fan and motor speeds, a sound-level meter for assessing noise levels, and a clip-on ammeter to measure the electrical draw on fans and pumps. Make sure all instruments are calibrated and set to U.S. units, such as CFM, inches of water gauge (in. wg), RPM, decibels (dB), and amperes, to ensure precision.
Equally important are the documents that outline the system’s design parameters. Keep duct design drawings, equipment specifications, and airflow charts accessible to reference target airflow and pressure values. A National HVAC Design Report or a project-specific design report provides critical baseline metrics, while the Testing, Adjusting, and Balancing (TAB) submittal package ensures all adjustments stay within required tolerances. After testing, record the results in a TAB field report and retain all documentation for quality assurance and future maintenance needs.
Armed with the right tools and thorough documentation, you can achieve accurate airflow measurements and adjustments, typically meeting the ±10% tolerance necessary for proper HVAC system balancing.


